

Hi friends! Today, I’m sharing a recipe for one of my all-time favorite appetizers Cheese Rolls! These crispy, cheesy delights are a must-have on the iftar table during Ramadan, but they’re also perfect for any gathering. I don’t know anyone who’s tried them and didn’t love them! Let’s get started and make these irresistible treats together.
Method
Preparing the Cheese Mixture
To begin, prepare the akawi cheese, which is known for its salty flavor. Because excessive salt can overpower the delicate balance of flavors in the cheese rolls, it is essential to reduce its saltiness. Start by shredding the akawi cheese if it hasn’t been pre-shredded. Then, place the shredded cheese in a bowl of water and let it soak for about 5 minutes. This soaking process helps to draw out some of the excess salt.
After 5 minutes, drain the cheese using a fine-mesh strainer or by pouring the cheese into a clean kitchen towel. Squeeze out as much excess water as possible by pressing the cheese with a paper towel or twisting the kitchen towel firmly. Ensuring that the cheese is well-drained is crucial, as any remaining moisture could make the spring roll wrappers soggy.
Once the akawi cheese is drained, transfer it to a large mixing bowl. Add the shredded mozzarella cheese, which enhances the creamy and stretchy texture of the filling. Next, sprinkle in the dried or freshly chopped parsley to add a mild herbal note to the mixture. Using clean hands or a spoon, mix everything together until the ingredients are evenly combined. The two cheeses should be well incorporated, ensuring that each bite of the cheese roll has the perfect balance of flavors and textures.
Assembling the Cheese Rolls
With the cheese mixture ready, it’s time to assemble the cheese rolls. First, lay a single spring roll wrapper on a clean, dry surface. Position it so that one of the corners is pointing toward you, resembling a diamond shape. This arrangement makes it easier to roll the wrapper neatly and securely.
Scoop about 3 tablespoons of the cheese mixture and place it approximately 2 inches from the bottom corner of the wrapper. Gently shape the cheese mixture into a small log to make rolling easier.
Begin rolling by folding the bottom corner of the wrapper over the cheese filling, making sure to tuck it tightly to secure the filling. Then, fold in the left and right sides toward the center, enclosing the cheese mixture inside the wrapper. This step prevents any filling from escaping during frying.
Once the sides are folded, continue rolling the wrapper upwards until you reach the top corner. Before sealing, dip a finger into the water and lightly moisten the top edge of the wrapper. Press firmly to ensure the roll is sealed completely. This water acts as glue, preventing the roll from opening while frying.
Repeat this process until all 20 cheese rolls are neatly assembled and ready for frying. If you’re not frying them immediately, you can cover the rolls with a slightly damp towel to prevent the wrappers from drying out.
Frying the Cheese Rolls
To fry the cheese rolls, start by heating a sufficient amount of oil in a frying pan or deep fryer over medium heat. The oil should be hot enough to create a crispy golden exterior without burning the rolls. To test if the oil is ready, drop a small piece of a spring roll wrapper into the oil if it sizzles and rises to the top quickly, the oil has reached the perfect frying temperature.
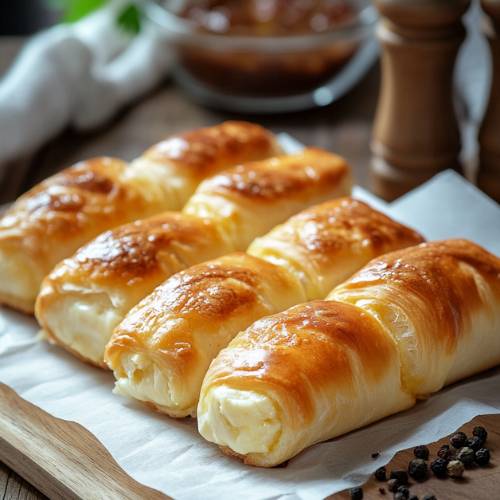
Carefully place a few cheese rolls into the hot oil, making sure not to overcrowd the pan. Overcrowding lowers the oil temperature and results in uneven cooking. Let the cheese rolls fry for about 2-3 minutes, gently turning them occasionally using a slotted spoon or tongs. Fry until they achieve a light golden brown and crispy exterior.
Once fried to perfection, use a slotted spoon to lift the cheese rolls out of the oil and transfer them to a plate lined with paper towels. The paper towels help absorb excess oil, keeping the rolls crisp and light rather than greasy.
Continue frying the remaining rolls in small batches, ensuring that each batch cooks evenly and maintains its delicious crispiness.
Necessary Tools
- Large mixing bowl
- Cutting board
- Sharp knife
- Small bowl for water
- Frying pan or deep fryer
- Slotted spoon
- Paper towels
- Tongs

Cheese Rolls Recipe
Cuisine: LebaneseDifficulty: Easy20
servings15
minutes10
minutes25
minutesIngredients
3 cups akawi cheese, shredded
3 cups mozzarella cheese, shredded
3 tbsp dried parsley (or fresh)
1 package spring roll wrappers (20 sheets)
½ cup water
Oil for frying
Directions
- Preparing the Cheese Mixture: Start by preparing the akawi cheese. Since akawi is a salty cheese, soak the shredded cheese in water for about 5 minutes to remove some of the excess salt. After soaking, drain the cheese thoroughly and squeeze out any excess water using a clean kitchen towel or paper towels. This step ensures the perfect balance of saltiness in the cheese rolls.
Next, in a large mixing bowl, combine the drained akawi cheese with the shredded mozzarella cheese. Add the dried or fresh parsley to the cheese mixture and mix everything well until evenly combined. This combination of cheeses gives the rolls a deliciously gooey texture when melted. - Assembling the Cheese Rolls: Lay a spring roll wrapper on a clean, flat surface, positioning it like a diamond with a corner pointing toward you. Take about 3 tablespoons of the cheese mixture and place it roughly 2 inches from the bottom corner of the wrapper.
Fold the bottom corner of the wrapper over the cheese mixture, ensuring it is tightly wrapped. Then, fold in the left and right sides toward the center, making sure the filling stays secure inside. Now, roll the wrapper upward, keeping it tight as you go. Before sealing, dip your finger in the water and lightly brush it along the top edge of the wrapper. Press firmly to seal the roll completely.
Repeat this process until all 20 rolls are assembled and ready for frying. - Frying the Cheese Rolls: Heat oil in a frying pan or deep fryer over medium heat. To test if the oil is ready, drop a small piece of wrapper into the oil if it bubbles and rises to the top quickly, the oil is at the right temperature.
Gently drop a few cheese rolls into the hot oil, being careful not to overcrowd the pan. Fry them for about 2-3 minutes, turning occasionally, until they become light golden brown and crispy. Use a slotted spoon or tongs to remove the rolls from the oil and place them on a plate lined with paper towels to absorb any excess oil.
Repeat the frying process until all the cheese rolls are cooked.
Notes
- Make sure to drain the akawi cheese well after soaking to prevent excess moisture from making the wrappers soggy.
- Roll the wrappers tightly to keep the cheese from leaking out during frying.
- Don’t overcrowd the frying pan; frying in small batches ensures even cooking and crispiness.
- Keep an eye on the rolls while frying they cook quickly and can turn too dark if left unattended.


Serving Suggestions
These cheese rolls taste best when served hot and crispy! You can pair them with a dipping sauce like garlic yogurt sauce, marinara sauce, or even a simple honey drizzle for a sweet-savory twist. They make a fantastic appetizer alongside fresh salads or soups for a complete meal.
Fun Fact
Did you know that akawi cheese originates from the Middle East and is commonly used in pastries and desserts? It has a stretchy texture, similar to mozzarella, making it perfect for melting inside these delicious cheese rolls!
Conclusion
I hope you enjoy making and eating these crispy, cheesy rolls as much as I do! They’re a perfect addition to your iftar table or any special occasion. Let me know how yours turn out happy cooking!