
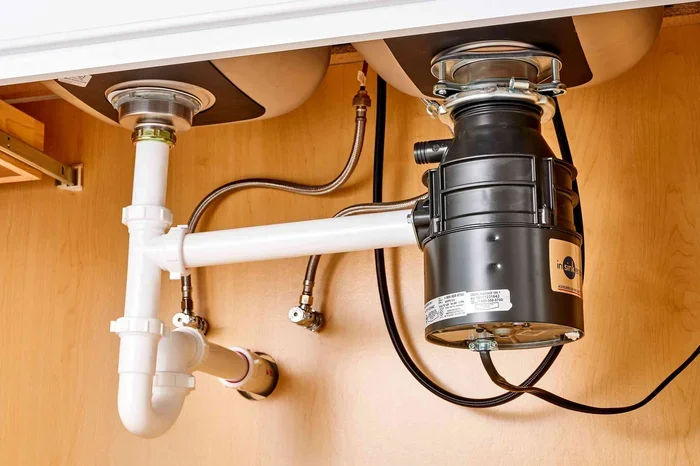

Installing kitchen sink plumbing is easier than most homeowners think when you follow the right steps. This guide walks you through removing old plumbing, connecting drain pipes, setting up supply lines, and avoiding costly errors. You will learn exactly what tools you need, how to seal connections properly, and how to test your work like a professional plumber.
Kitchen sink plumbing might look intimidating at first glance. All those pipes, valves, and connections under the sink can make anyone hesitate. But here is the truth: installing kitchen sink plumbing is a task most homeowners can handle on their own.
You do not need years of experience or expensive tools. With a clear plan and a little patience, you can have your under sink plumbing working perfectly in a few hours. This guide breaks down every step in plain language so you feel confident from start to finish.
Whether you are replacing an old drain, upgrading to a garbage disposal, or installing a brand new faucet, this article covers it all. We will walk you through each phase of the plumbing installation process. You will learn what tools to grab, how to make secure connections, and which mistakes to avoid at all costs.
By the time you finish reading, you will have a solid understanding of how sink plumbing works and the skills to tackle the job yourself. Let us get started.
Key Takeaways
- Right Tools Matter: Having the correct plumbing tools saves time and prevents damage to fittings.
- Shut Off Water First: Always turn off the water supply valve before starting any plumbing work.
- Seal Connections Properly: Using plumber’s putty and Teflon tape prevents leaks under your sink.
- P-Trap Installation Is Key: The P-trap stops sewer gases from entering your kitchen and catches debris.
- Test Before Finishing: Running water and checking for leaks after installation saves you from expensive repairs later.
- Know When to Call a Pro: Some complex plumbing setups need a licensed professional for safety and code compliance.
📑 Table of Contents
- Gathering Your Tools and Materials for Kitchen Sink Plumbing
- How to Remove Your Old Kitchen Sink Plumbing
- Step-by-Step Guide to Installing Kitchen Sink Plumbing
- Connecting the Faucet and Water Supply Lines
- Testing Your Kitchen Sink Plumbing Setup
- Common Mistakes to Avoid When Installing Kitchen Sink Plumbing
- When to Call a Professional Plumber
- Maintenance Tips to Keep Your Kitchen Sink Plumbing in Great Shape
- Comparing Different Kitchen Sink Plumbing Materials
- Key Takeaways
- Frequently Asked Questions
- Conclusion
Gathering Your Tools and Materials for Kitchen Sink Plumbing
Before you touch a single pipe, make sure you have everything ready. Walking back and forth to the hardware store mid-project is frustrating and wastes time. A good plumbing toolkit makes the whole process smoother and faster.
Essential Plumbing Tools
- Adjustable wrench for tightening and loosening nuts
- Channel-lock pliers for grip on slippery fittings
- Plumber’s putty for sealing around the drain flange
- Teflon tape for sealing threaded connections
- Bucket to catch water left in the pipes
- Plunger for clearing minor blockages
- Socket set for removing mounting nuts
- Tubing cutter if you need to trim copper supply lines
Materials You Will Need
- Sink drain assembly including the basket strainer and tailpiece
- P-trap and slip joint nuts for the drain connection
- Supply lines (braided stainless steel is a great choice)
- Plumbing sealant or silicone for waterproofing joints
- Garbage disposal (if you are upgrading or installing one)
- New faucet (if replacing an old one)
- Washers and gaskets for leak-free connections
Quick Tip: Buy extra washers and gaskets. They are cheap and they prevent leaks. It is always better to have more than you need than to run back to the store.
How to Remove Your Old Kitchen Sink Plumbing
Removing old plumbing is the first real step in any DIY plumbing project. It might seem simple, but doing it the right way protects your pipes and your countertop. Take your time here and the rest of the job goes much smoother.
Step 1: Shut Off the Water Supply
Locate the water supply valve under the sink. Turn it clockwise to shut off both the hot and cold water lines. Once the valves are off, turn on the faucet to release any remaining water pressure. Place your bucket underneath to catch the last few drips.
Step 2: Disconnect the Supply Lines
Position your bucket directly under the supply lines. Use your adjustable wrench to loosen the supply line nuts where they connect to the faucet handles. Slowly twist and pull the lines free. Water will spill out, so keep the bucket ready.
Step 3: Remove the P-Trap
The P-trap is the curved pipe under your sink. Place your bucket below it. Use pliers to loosen the slip joint nuts on both ends of the P-trap. Once loose, carefully pull the P-trap away and let any trapped water drain out.
Step 4: Detach the Drain Assembly
Reach up under the sink and unscrew the drain flange from the top. Apply even pressure and twist gently. If the drain is stuck, a little penetrating oil can help loosen corrosion. Set all old parts aside so you can see what you are working with.
Common Mistake: Many people forget to place a bucket before disconnecting pipes. Water left in the P-trap and supply lines will spill out fast. Always have your catch basin ready before loosening any fitting.
Step-by-Step Guide to Installing Kitchen Sink Plumbing
Now comes the exciting part. You have your tools, your new parts, and a clean workspace. This is where you build your kitchen sink plumbing setup from scratch. Follow these steps in order for the best results.
Step 1: Install the Basket Strainer and Drain Flange
Apply a thin ring of plumber’s putty around the underside of the basket strainer. Push it up through the drain hole in your sink from below. On top, place the rubber gasket and the mounting nut. Tighten the nut by hand first, then use pliers to snug it up. Wipe away any excess putty that squeezes out with a damp cloth.
The plumber’s putty creates a watertight seal between the strainer and the sink surface. Let it sit for at least a few hours before running water through the drain. This curing time is important for a leak-free seal.
Step 2: Connect the Tailpiece
The tailpiece is the vertical pipe that drops down from the drain. Thread it into the bottom of the basket strainer and hand-tighten the nut. Make sure it lines up with the rest of your drain piping. Use Teflon tape on the threads for a secure fit.
Step 3: Attach the P-Trap
The P-trap is the U-shaped pipe that holds water and blocks sewer gases. Connect one end of the P-trap to the tailpiece using a slip joint nut. Connect the other end to the wall drain pipe. Hand-tighten both nuts first, then give them a quarter turn with your pliers. Do not overtighten, or you risk cracking the plastic.
Expert Insight: The P-trap must maintain a water seal at all times. If the water seal breaks, sewer gases can enter your kitchen. Make sure the P-trap sits at the correct angle and the slip joints are tight but not forced.
Step 4: Install the Garbage Disposal (If Applicable)
If your setup includes a garbage disposal, this is the time to connect it. Mount the disposal unit to the sink flange using the provided mounting ring. Connect the dishwasher drain hose to the disposal inlet if you have a dishwasher. Attach the discharge tube to the P-trap inlet and secure it with a hose clamp.
Make sure all electrical connections are properly grounded and follow local electrical codes. If you are not comfortable with wiring, hire a licensed electrician for this part of the job.
Connecting the Faucet and Water Supply Lines
With the drain side complete, it is time to focus on the water supply. Proper faucet installation and supply line connections are essential for a leak-free kitchen sink.
Installing the Faucet
If you are installing a new faucet, start by threading the faucet base through the sink holes. Apply plumber’s putty around the base if your faucet manual recommends it. From underneath, secure the mounting nuts and tighten them evenly. This prevents the faucet from wobbling or leaking around the base.
Connect the hot and cold water lines to the corresponding valves on the faucet. Some faucets come with pre-attached supply lines, which makes this step much easier.
Attaching the Supply Lines
Take your braided stainless steel supply lines and connect one end to the faucet and the other to the shut-off valves under the sink. Use an adjustable wrench to tighten the fittings. Wrap Teflon tape around the threaded connections for extra leak protection.
Once connected, slowly turn the shut-off valves back on. Check every connection point for drips. If you see any water seeping out, tighten the fitting slightly or reapply Teflon tape and try again.
Quick Tip: Braided stainless steel supply lines are more durable than rubber hoses. They resist bursting and last much longer. Spend a few extra dollars on quality supply lines, and you will not have to worry about them for years.
Testing Your Kitchen Sink Plumbing Setup
Testing is the most important part of the entire process. A thorough test catches leaks before they become expensive water damage. Do not skip this step.
Run Water and Check for Leaks
Turn on both the hot and cold water valves slowly. Let the water run for at least two minutes. Watch every connection point carefully. Look under the sink for any drips or moisture on the pipes, fittings, and joints.
Run the disposal if you installed one. Flush it with cold water and check the connections around the disposal unit. Next, fill the sink with water and let it drain. Watch the P-trap and drain connections for any signs of leaking.
Common Leak Points to Watch
- Slip joint nuts on the P-trap and tailpiece
- Supply line connections at the valves and faucet
- Drain flange where the strainer meets the sink
- Garbage disposal connections and dishwasher hose
- Wall drain pipe where the P-trap connects
If you find a leak, turn off the water supply and tighten the fitting. If the leak persists, disassemble the connection, apply fresh Teflon tape or plumber’s putty, and reassemble. Most small leaks are caused by loose fittings or missing tape.
Common Mistakes to Avoid When Installing Kitchen Sink Plumbing
Even experienced DIYers make mistakes. Knowing what to watch out for saves you time, money, and headaches. Here are the most common errors people make with under sink plumbing.
Overtightening Fittings
It is tempting to crank down on every nut as hard as you can. But overtightening cracks plastic fittings and strips threads. Hand-tighten first, then give it just a quarter turn with pliers. That is all you need.
Using the Wrong Size Parts
Not all drain assemblies and supply lines fit every sink. Measure your pipes and fittings before you buy replacement parts. Using the wrong size means leaks, poor drainage, or having to redo the entire connection.
Skipping the Vent Connection
Your plumbing vent allows air into the drain system so water flows smoothly. Without proper venting, your sink drains slowly and gurgles. Make sure your drain setup connects to the main vent stack or has an air admittance valve if local codes allow it.
Forgetting to Clean Up Plumber’s Putty
Plumber’s putty that hardens on the surface of your sink looks messy and can be difficult to remove later. Wipe it away while it is still soft with a damp cloth right after installation.
Not Checking Local Plumbing Codes
Every area has its own plumbing codes and regulations. Some require permits for certain types of plumbing work. Check with your local building authority before you start. This is especially important if you are doing significant rework on your plumbing connections.
Expert Insight: Professional plumbers always double-check every connection before calling a job complete. Adopt this habit yourself. A second look at each fitting can save you from a flooded kitchen or water damage that costs thousands of dollars to repair.
When to Call a Professional Plumber
There is no shame in calling a pro. Some plumbing situations are simply beyond a DIY project. Knowing when to ask for help saves you from making costly mistakes.
Call a licensed plumber if you encounter any of the following situations. Major pipe corrosion or rust on your existing plumbing is a red flag. If your home has old galvanized steel pipes, you may need a full repipe rather than just sink work. A main line blockage or sewer backup requires professional equipment and expertise.
Also call a pro if your plumbing vent system needs repair or if you are adding plumbing fixtures that require new venting. Local building codes may require a permit for this type of work, and a licensed professional can handle the inspection process for you.
Finally, if you have tried everything and your kitchen sink plumbing still leaks or drains poorly, it is time to bring in an expert. Persistent problems often point to deeper issues that need professional diagnosis.
Maintenance Tips to Keep Your Kitchen Sink Plumbing in Great Shape
Once your sink plumbing installation is complete and tested, a little regular maintenance keeps everything running smoothly for years.
Clean Your P-Trap Regularly
Your P-trap catches food particles, grease, and debris. Over time, this buildup can cause slow drainage and odors. Remove the P-trap every few months and clean it out with warm soapy water. This simple habit prevents clogs and keeps your drain flowing freely.
Use a Drain Strainer
A small mesh strainer over your drain catches food scraps and prevents them from going down the pipe. This reduces buildup in your drain assembly and helps your garbage disposal work more efficiently.
Run Hot Water After Each Use
Flushing your drain with hot water after washing dishes helps melt away grease buildup. This keeps your drain pipe clear and reduces the need for harsh chemical drain cleaners.
Check Supply Line Connections Annually
Once a year, look under your sink and check all supply line connections for signs of moisture or corrosion. Catching a small drip early prevents it from becoming a big problem. Tighten any loose fittings and replace any worn washers or gaskets.
Comparing Different Kitchen Sink Plumbing Materials
Choosing the right materials for your plumbing connections affects durability, cost, and ease of installation. Here is a quick comparison of the most common options.
| Material | Durability | Cost | Best For |
|---|---|---|---|
| PVC Plastic | Good for residential use | Low | Drain pipes and P-traps |
| Brass Fittings | Very durable and long-lasting | Medium to high | Supply line connections |
| Stainless Steel Supply Lines | Excellent, resists bursting | Medium | Water supply connections |
| Copper Pipes | Very strong, corrosion-resistant | High | Professional-grade plumbing |
| Chrome-Plated Steel | Good, common in faucets | Low to medium | Faucet and supply line finishes |
For most homeowners doing a DIY sink plumbing project, PVC for drain lines and braided stainless steel for supply lines is the best combination. These materials are affordable, easy to work with, and reliable for everyday kitchen use.
Key Takeaways
- Right Tools Matter: Having the correct plumbing tools saves time and prevents damage to fittings.
- Shut Off Water First: Always turn off the water supply valve before starting any plumbing work.
- Seal Connections Properly: Using plumber’s putty and Teflon tape prevents leaks under your sink.
- P-Trap Installation Is Key: The P-trap stops sewer gases from entering your kitchen and catches debris.
- Test Before Finishing: Running water and checking for leaks after installation saves you from expensive repairs later.
- Know When to Call a Pro: Some complex plumbing setups need a licensed professional for safety and code compliance.
- Maintain Regularly: Cleaning your P-trap and checking supply lines annually keeps your plumbing in top shape.
Frequently Asked Questions
How long does it take to install kitchen sink plumbing?
For most homeowners, installing or replacing kitchen sink plumbing takes between two and four hours. If you are adding a garbage disposal or upgrading your faucet, add an extra hour. The time depends on your experience level and the complexity of the setup. First-timers should plan for a full afternoon to stay relaxed and thorough.
Do I need a permit to install kitchen sink plumbing?
It depends on your local building codes. Many municipalities require a permit for plumbing work that involves rerouting drain lines or modifying the vent system. Simple sink replacement and supply line swaps usually do not need a permit. Check with your local building department before you start to be sure.
What is the best pipe material for kitchen sink drain plumbing?
PVC is the most common and affordable choice for kitchen sink drain pipes. It is lightweight, easy to cut, and resists corrosion. For older homes with copper plumbing, copper pipes work well but require soldering skills. For supply lines, braided stainless steel is the top choice because it handles pressure well and resists bursting.
Can I install a kitchen sink plumbing system without any prior experience?
Yes, many homeowners successfully install sink plumbing with no prior experience. The key is following a clear guide like this one, taking your time, and not rushing any step. Start with simple tasks like replacing a drain assembly or supply lines before tackling more complex jobs like garbage disposal installation. Watch a few video tutorials beforehand to build confidence.
Why does my kitchen sink drain smell after plumbing installation?
A bad smell usually means the P-trap has dried out or is not holding water properly. The P-trap keeps a water seal that blocks sewer gases. If you have not used the sink in a while, run water for a minute to refill the trap. If the smell persists, check that all connections are tight and the drain assembly is properly sealed with plumber’s putty.
How do I know if my kitchen sink plumbing connections are leak-free?
The best way to test is to run water for at least two minutes and inspect every joint under the sink with a flashlight. Dry paper towels work great for wiping down connections and revealing hidden moisture. Also place a dry paper towel under each fitting and check it after running the disposal and draining the sink. Any dampness means you need to tighten or reseal that connection.
Conclusion
Installing kitchen sink plumbing is one of the most rewarding DIY projects you can take on. It saves you money, teaches you valuable home maintenance skills, and gives you the satisfaction of a job well done. From gathering your tools to testing every connection, each step brings you closer to a fully functional, leak-free sink.
Remember to work patiently, follow each step carefully, and never skip the testing phase. Your under sink plumbing deserves the same attention to detail that a professional plumber would give it. With the right materials, the correct tools, and this guide, you have everything you need to succeed.
Start your kitchen sink plumbing project today. You will be surprised at how capable you are when you have a clear plan in hand. And if you ever feel stuck, a professional plumber is always just a phone call away. Happy plumbing!