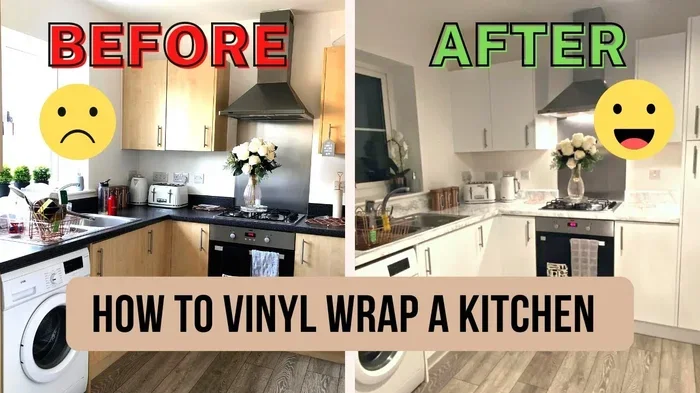

Yes, you can vinyl wrap kitchen cabinets and it is one of the easiest and most affordable ways to give your kitchen a stunning new look. Vinyl wrap kitchen cabinets lets you skip the mess and cost of painting or replacing cabinets entirely. With peel and stick vinyl, anyone can achieve a professional-grade cabinet transformation in just a weekend. This guide covers everything from materials and tools to a full step-by-step application process. You will learn why vinyl wrap cabinets are a smart choice for any budget kitchen update.
Have you been staring at your kitchen cabinets and thinking they need a serious upgrade? Maybe the color is outdated or the finish is chipped and worn. Before you spend thousands on new cabinets or hire a contractor, consider a simpler solution. Can you vinyl wrap kitchen cabinets? The short answer is yes, and it is one of the smartest moves you can make for a kitchen refresh.
Vinyl wrap kitchen cabinets has exploded in popularity over the past few years. Homeowners, renters, and DIY enthusiasts all love how easy and affordable it is. You get a brand new look without the dust, mess, and expense of a full kitchen renovation. Whether you want matte black cabinets, wood grain textures, or bold geometric patterns, vinyl has you covered.
This guide walks you through everything you need to know. From choosing the right material to applying it like a pro, we have got you covered. By the end, you will feel confident tackling your own cabinet transformation project. Let us dive in.
Key Takeaways
- Vinyl wrapping is a real option: You can absolutely vinyl wrap kitchen cabinets with the right materials and a little patience.
- It saves money and time: A full kitchen cabinet makeover with vinyl costs a fraction of replacement or professional refacing.
- Peel and stick vinyl is beginner-friendly: No special skills or expensive tools are needed for most projects.
- Prep work is critical: Clean, sand, and dry your cabinets thoroughly before applying any vinyl.
- Durability is strong: A properly applied vinyl wrap can last 5 to 10 years in kitchen conditions.
- Removal is easy and damage-free: High-quality vinyl peels off cleanly without ruining your original cabinet finish.
- Heat helps with application: A heat gun or hair dryer makes conforming vinyl to curves and edges much easier.
📑 Table of Contents
- Why Vinyl Wrap Kitchen Cabinets Is a Great Idea
- How to Vinyl Wrap Kitchen Cabinets Step by Step
- Choosing the Right Vinyl Wrap Material
- Vinyl Wrap vs Paint: Which Is Better for Cabinets?
- Common Mistakes to Avoid When Wrapping Cabinets
- How Long Does a Vinyl Cabinet Wrap Last?
- Is Vinyl Wrapping Cabinets Worth It?
Why Vinyl Wrap Kitchen Cabinets Is a Great Idea
There are so many reasons people choose to vinyl wrap cabinets instead of painting or replacing them. Let us look at the biggest benefits that make this option so appealing.
It Costs a Fraction of Cabinet Replacement
New kitchen cabinets can cost anywhere from $4,000 to $20,000 or more. Even a professional cabinet refacing job runs several thousand dollars. With vinyl wrap kitchen cabinets, you can transform your entire kitchen for a few hundred dollars. The material itself is surprisingly affordable, and you do not need to hire anyone.
Think about it. A roll of self-adhesive vinyl costs between $20 and $60. One roll can cover multiple cabinet doors. Add in a few rolls of contact paper for drawer fronts, and you are still spending less than $200 total. That is a massive savings compared to any other option.
No Sanding, No Painting, No Mess
Painting cabinets is messy. You need to sand every surface, apply primer, paint, and then wait for it to dry. Then you repeat the process. It can take days and fill your home with fumes and dust.
Vinyl wrap application is completely different. There is no sanding required if your existing finish is smooth and in good condition. You simply clean the surface, measure and cut your vinyl, and stick it on. Most people finish a full set of kitchen cabinets in one or two weekends. The DIY cabinet project is genuinely doable for beginners.
Endless Design Options
When you paint cabinets, you are limited to whatever paint colors and finishes are available. Vinyl offers almost unlimited variety. You can find wood grain textures that look incredibly realistic. There are matte, gloss, and satin finishes. You can get patterns like marble, concrete, and even metallic looks.
Some popular vinyl wrap cabinet styles include:
- Matte black for a modern, sleek look
- White marble texture for a clean, elegant feel
- Wood grain oak or walnut for a warm, classic appearance
- Brushed metal or stainless steel for an industrial vibe
- Geometric patterns or colorful designs for a bold statement
The variety means you can match any kitchen style or create something completely unique. Vinyl wrap kitchen cabinets gives you creative freedom that painting simply cannot match.
It Is Reversible
One of the biggest advantages of vinyl wrap cabinets over paint is that it is removable. If you ever want to change the look again, you can peel the vinyl off without damaging the original cabinet surface. This makes it perfect for renters or anyone who likes to update their space frequently.
Just make sure you use a quality vinyl wrap remover or a gentle heat source to avoid leaving residue. High-quality adhesive vinyl designed for surfaces like cabinets will come off cleanly in most cases.
How to Vinyl Wrap Kitchen Cabinets Step by Step
Now for the fun part. Applying vinyl to your cabinets is easier than you might think. Follow these steps carefully and you will get great results even on your first try.
Step 1: Gather Your Materials and Tools
Before you start, make sure you have everything you need. Here is a simple checklist:
- Vinyl wrap rolls in your chosen design (measure your cabinet doors first)
- Contact paper for drawer fronts and smaller surfaces
- A heat gun or regular hair dryer
- A cutter knife or precision utility knife
- A cutting mat to protect your work surface
- A measuring tape and pencil
- A squeegee or credit card for smoothing out bubbles
- Rubbing alcohol or surface cleaner
- Microfiber cloths for wiping down surfaces
- Scissors for cutting the vinyl
Step 2: Remove Cabinet Doors and Hardware
Take all your cabinet doors, drawers, and hardware off. Use a screwdriver to remove hinges, knobs, and pulls. Lay everything out on a clean, flat surface. Number each door and its corresponding location so you can put everything back in the right place later.
This step is essential. Trying to apply vinyl while doors are still attached is a frustrating and messy process. Removing them gives you full access and makes the job much smoother.
Step 3: Clean and Prep the Surfaces
This is the most important step. If your cabinets are dirty or greasy, the vinyl will not stick properly. Wipe down every surface with rubbing alcohol or a degreaser. Use a microfiber cloth to remove all dust, grime, and residue.
Let the surfaces dry completely before moving on. Any moisture trapped under the vinyl will cause bubbling and peeling later. A clean, dry surface is the foundation of a successful vinyl wrap application.
Step 4: Measure and Cut the Vinyl
Measure each cabinet door carefully. Add about one inch of extra vinyl on each side so you have room to wrap around edges. Use your cutting knife on the cutting mat to trim the vinyl to size.
Pro tip: Cut the vinyl slightly larger than you think you need. You can always trim the edges down, but it is very hard to add more vinyl if you cut too small.
Step 5: Apply the Vinyl
Peel off a small section of the backing and start attaching the vinyl to the door. Work slowly from one side to the other. Use your squeegee or credit card to press the vinyl down firmly and push out any air bubbles as you go.
For flat cabinet doors, this part is straightforward. For doors with raised panels or curved edges, you will need a little more technique. Use your heat gun on a low setting to gently warm the vinyl as you go around curves. The heat makes the vinyl flexible and allows it to conform to the shape without wrinkling or bubbling.
Step 6: Trim the Edges
Once the vinyl is applied, use your precision knife to carefully trim any excess material around the edges. Go slowly and use light pressure. A sharp blade gives you the cleanest cuts.
For cabinet doors with recessed panels, you will need to carefully cut around the edges of the panel to make the vinyl wrap neatly around it. Take your time here to get a clean finish.
Step 7: Repeat for All Doors and Drawers
Now that you have the hang of it, repeat the process for every cabinet door and drawer front in your kitchen. This is the most time-consuming part, but it goes faster once you get into a rhythm.
Set a goal to do a few doors at a time. Take breaks when needed. Rushing through the process can lead to mistakes like air bubbles, misaligned cuts, or wrinkles that are hard to fix later.
Step 8: Let It Cure
Once all your doors are wrapped, let them sit for at least 24 hours before reattaching them. This allows the adhesive to fully bond to the cabinet surface. After the cure time, reattach your doors, add the hardware back on, and admire your handiwork.
Choosing the Right Vinyl Wrap Material
Not all vinyl wraps are created equal. Choosing the right material makes a huge difference in the final result and how long it lasts.
Cast Vinyl vs. Calendered Vinyl
There are two main types of adhesive vinyl used for wrapping.
Cast vinyl is the premium option. It is thinner, more flexible, and conforms better to curved or textured surfaces. It is also more durable and resistant to fading. Cast vinyl is the best choice for kitchen cabinets because it handles heat and moisture well.
Calendered vinyl is thicker and more rigid. It works well on flat surfaces but can struggle with curves and edges. It is also less durable over time. For vinyl wrap kitchen cabinets, cast vinyl is the clear winner.
Glossy vs. Matte Finish
Glossy vinyl gives a shiny, reflective finish that makes colors pop. It is great for a modern or contemporary kitchen look. Matte vinyl has a flat, non-reflective finish that hides fingerprints and smudges better. It also gives a more sophisticated, understated appearance.
For kitchen cabinets, many homeowners prefer matte or satin finishes. They look elegant and hide everyday wear better than glossy options.
Pattern and Texture Options
The texture of your vinyl wrap can completely change the feel of your kitchen. Wood grain textures add warmth and classic charm. Concrete or stone textures create a modern, industrial feel. Metallic finishes add a touch of glamour and luxury.
When choosing a pattern, consider your existing kitchen decor. You want the vinyl to complement your countertops, backsplash, and flooring rather than clash with them. Think of vinyl wrap cabinets as one piece of a larger design puzzle.
Where to Buy Quality Vinyl Wrap
You can find vinyl wrap cabinet material at home improvement stores, online retailers, and specialty wrap shops. Some popular brands include 3M, Oracal, and Avery Dennison. Always check reviews and look for vinyl that is specifically rated for interior use and surface application.
Vinyl Wrap vs Paint: Which Is Better for Cabinets?
This is one of the most common questions people ask when considering a kitchen cabinet makeover. Both options have pros and cons. Let us compare them side by side.
| Feature | Vinyl Wrap | Paint |
|---|---|---|
| Cost | $100-$400 total | $200-$800+ total |
| Time to Complete | 1-2 weekends | 3-5 days (with drying) |
| Mess Level | Very low | High (fumes, drips, dust) |
| Reversibility | Yes, easy to remove | No, permanent |
| Design Variety | Extremely high | Limited to paint colors |
| Durability | 5-10 years | 5-15 years |
| Skill Level Needed | Beginner-friendly | Intermediate |
| Surface Prep Required | Minimal (clean and dry) | Extensive (sand, prime) |
As you can see, vinyl wrap kitchen cabinets wins on cost, speed, and ease. Paint offers more durability in some cases and a more traditional finish. But for most homeowners looking for a quick, affordable update, vinyl is the clear winner.
If your cabinets are in really rough shape with deep scratches or damage, paint might be the better option because it can hide imperfections better. But for cabinets that are in decent condition, vinyl wrap cabinets is the smarter choice.
Common Mistakes to Avoid When Wrapping Cabinets
Even though vinyl wrap application is straightforward, there are some common pitfalls that can ruin your results. Here is what to watch out for.
Skipping Surface Preparation
This is the number one mistake people make. If you apply vinyl to a dirty or greasy surface, it will not stick properly. You will see peeling and bubbling within weeks. Always clean your cabinets thoroughly with rubbing alcohol before applying any self-adhesive vinyl.
Not Using Enough Heat
Many people are afraid to use a heat gun because they worry about damaging the vinyl. In reality, a low-heat setting is essential for getting the vinyl to conform to edges and curves. Without enough heat, you will get wrinkles and bubbles that are impossible to fix later.
Hold the heat gun about six inches from the surface and move it constantly. You want the vinyl to become soft and pliable, not hot or bubbly.
Measuring Incorrectly
Measure twice and cut once. This old saying is especially true with vinyl wrapping. If you cut the vinyl too small, you will have gaps or exposed edges. If you cut it too big, you will have bulky overlapping seams.
Take accurate measurements of each door and drawer front before you start cutting. Account for any overlap needed to wrap around edges.
Rushing the Application
Vinyl wrapping is not a race. If you rush through the process, you will make mistakes that take extra time to fix. Work slowly and deliberately. Smooth out each section carefully before moving on to the next one.
Using Low-Quality Vinyl
Cheap vinyl from unknown brands may seem like a good deal, but it often has weak adhesive that peels off quickly. It may also fade, yellow, or crack within months. Invest in quality adhesive vinyl from reputable brands. Your cabinet transformation will last much longer and look much better.
How Long Does a Vinyl Cabinet Wrap Last?
The lifespan of vinyl wrap kitchen cabinets depends on several factors, including the quality of the vinyl, how well it was applied, and the conditions in your kitchen.
In general, a high-quality vinyl wrap can last between 5 and 10 years in a kitchen environment. Some premium wraps have been known to last even longer with proper care.
Factors that affect durability include:
- Heat exposure: Proximity to the stove and oven can shorten the lifespan of vinyl. Use a heat-resistant wrap if your cabinets are near a cooking area.
- Moisture levels: Kitchens tend to be humid. Quality vinyl is designed to handle moisture, but poor ventilation can cause edges to lift over time.
- UV exposure: If your kitchen gets a lot of direct sunlight, the vinyl may fade or discolor over time. Choose UV-resistant vinyl for the best results.
- Application quality: A well-applied vinyl wrap with no bubbles or wrinkles will last significantly longer than a rushed job.
To extend the life of your vinyl wrap cabinets, clean them with a soft damp cloth and mild soap. Avoid abrasive cleaners or scrub brushes that can scratch the vinyl surface. With proper care, your wrapped cabinets will look great for years.
Is Vinyl Wrapping Cabinets Worth It?
The short answer is yes, absolutely. Vinyl wrap kitchen cabinets offer an incredible value for anyone looking to refresh their kitchen without a massive investment. The cost is low, the process is simple, and the results are impressive.
Whether you are a renter who cannot make permanent changes, a homeowner on a tight budget, or someone who simply wants a quick update, vinyl wrapping is a fantastic solution. It gives you the look of new cabinets at a tiny fraction of the cost.
One of the best things about this approach is how satisfying it is. There is something incredibly rewarding about looking at your kitchen and realizing you transformed it yourself. The compliments from friends and family will keep coming, and you will feel proud knowing you did it on your own.
If you have been on the fence about trying vinyl wrap cabinets, now is the time. Grab some vinyl, gather your tools, and give your kitchen the makeover it deserves. You will be amazed at how great your kitchen can look with just a little effort and the right materials.
Remember, can you vinyl wrap kitchen cabinets? Yes, you totally can. And now you know exactly how to do it. Happy wrapping!
Frequently Asked Questions
Can you vinyl wrap kitchen cabinets with existing damage?
You can, but only if the damage is minor. Small scratches and surface imperfections can be covered by vinyl just fine. However, if your cabinets have deep dents, cracks, or significant water damage, the vinyl will not adhere properly and may peel off over time. Fix major damage first or consider painting as an alternative.
Is vinyl wrap removable from kitchen cabinets?
Yes, high-quality vinyl wrap is designed to be removable without damaging the original cabinet surface. Use a heat gun or hair dryer to gently warm the vinyl, then peel it off slowly. Any leftover residue can be cleaned with rubbing alcohol or a commercial adhesive remover.
How long does it take to vinyl wrap a full set of kitchen cabinets?
Most DIYers complete a full kitchen cabinet vinyl wrap in one to two weekends. The exact time depends on the number of cabinets, your experience level, and how detailed the application is. A small kitchen with 10 to 15 cabinet doors can be done in a single weekend.
Can you vinyl wrap kitchen cabinets that are already painted?
Yes, you can apply vinyl wrap over painted cabinets as long as the paint is in good condition. The surface must be clean, smooth, dry, and free of peeling or flaking paint. If the paint is chipped or bubbly, those areas should be touched up or sanded down before applying the vinyl for the best adhesion.
What is the best vinyl for wrapping kitchen cabinets?
Cast vinyl is the best option for kitchen cabinets because it is thin, flexible, and durable. Look for brands like 3M, Oracal, or Avery Dennison that offer interior-grade cast vinyl with strong adhesive. Matte or satin finishes tend to hide fingerprints and wear better in kitchen environments.
Does vinyl wrap kitchen cabinets add value to a home?
While vinyl wrapping is a cost-effective way to improve your kitchen’s appearance, it may not add significant resale value compared to a full renovation. However, it does make the kitchen more appealing to buyers who appreciate a fresh, updated look. It is a great investment for personal enjoyment and can help a home feel move-in ready.
=== CONCLUSION ===
Can you vinyl wrap kitchen cabinets? Absolutely yes, and it is one of the most rewarding DIY projects you can tackle. Vinyl wrap kitchen cabinets gives you a beautiful, updated kitchen without the enormous cost and hassle of replacement or professional refacing. The process is beginner-friendly, the materials are affordable, and the design options are virtually endless.
From choosing the right adhesive vinyl to following a careful step-by-step application process, you now have all the knowledge you need to succeed. Remember to prep your surfaces properly, take your time during application, and invest in quality materials for the best long-term results.
Whether you are looking for a quick budget kitchen update or a complete cabinet transformation, vinyl wrapping delivers impressive results that will make your kitchen feel brand new. So gather your supplies, put on some music, and start your DIY cabinet project today. Your dream kitchen is closer than you think.