
Installing end panels on kitchen cabinets is easier than most homeowners think. This guide walks you through every step, from measuring and cutting to securing and finishing. You will learn the right tools, common mistakes to avoid, and pro tips that save time and money. Whether you are upgrading existing cabinets or building new ones, this tutorial covers it all. Follow along and transform your kitchen with confidence.
Have you ever looked at your kitchen cabinets and thought they just need something extra? Maybe the sides look bare, or the gaps between cabinets and walls bother you every time you walk into the kitchen. That is exactly where end panels on kitchen cabinets come in. They hide gaps, add a finished look, and give your kitchen a polished appearance without the cost of a full cabinet replacement.
Installing end panels might sound intimidating if you have never done it before. But here is the truth: it is one of the most rewarding DIY kitchen projects you can tackle. With the right tools, a little patience, and this guide, you can do it yourself in a weekend. Let us walk through everything you need to know about how to install end panels on kitchen cabinets the right way.
Key Takeaways
- Measure Twice, Cut Once: Accurate measurements prevent wasted material and ensure a snug fit.
- Use the Right Tools: A scribe tool, circular saw, and adhesive make the job smoother and faster.
- Prepare Surfaces Before Installation: Clean, dry, and flat surfaces help panels stick and look professional.
- Match Your Cabinet Style: Choose between veneer, laminate, or custom-finished panels for a cohesive look.
- Avoid Common Mistakes: Skipping the scribe step or rushing the adhesive cure leads to gaps and uneven edges.
- Finish with Confidence: A little sanding and caulking goes a long way toward a polished, high-end result.
📑 Table of Contents
- Why End Panels Matter for Your Kitchen Cabinets
- Tools and Materials You Will Need
- How to Measure End Panels for Kitchen Cabinets
- Cutting End Panels to Size
- Step-by-Step Installation Process
- Common Mistakes to Avoid When Installing End Panels
- Expert Insights and Pro Tips
- Maintenance Tips for Your New End Panels
- When to Call a Professional
- Conclusion
Why End Panels Matter for Your Kitchen Cabinets
End panels do more than just look good. They serve a real purpose in your kitchen. When cabinets sit against an uneven wall or sit next to a refrigerator, gaps can appear. These gaps collect dust, look untidy, and can even affect how your cabinets function over time.
Adding kitchen cabinet end panels solves these problems. They create a clean, seamless look. They also protect the sides of your cabinets from moisture and damage. If you are doing a kitchen cabinet makeover, end panels are one of the simplest and most affordable upgrades you can make.
Types of End Panels You Can Choose
Not all end panels are the same. Before you start, it helps to know what options exist. Here are the most common types used in kitchen cabinet projects:
- Veneer End Panels: These are thin slices of real wood glued to a substrate. They look natural and elegant.
- Laminate End Panels: Made from melamine or thermofoil, these are durable and easy to clean.
- Painted MDF Panels: Medium-density fiberboard panels work great when you want a custom paint color.
- Custom-Finished Panels: These are built to match your exact cabinet design and finish.
Each type has its strengths. Veneer gives a classic wood feel. Laminate is budget-friendly and moisture-resistant. MDF works well when you want a solid paint finish. Choose based on your cabinet material and your kitchen style.
Tools and Materials You Will Need
Before you dive into the actual installation, gather everything you need. Having the right cabinet finishing tools and materials ready saves you trips to the store and keeps your momentum going.
Essential Tools
- Tape measure
- Carpenter’s pencil or marker
- Circular saw or table saw
- Scribe tool (this is crucial for uneven walls)
- Level
- Drill and screwdriver bits
- Clamps
- Sandpaper (120 and 220 grit)
- Caulk gun
Materials You Will Need
- Cabinet end panels (cut to size or purchased pre-sized)
- Wood glue or panel adhesive
- Finish nails or brad nails
- Wood filler (for filling nail holes and gaps)
- Paint or stain (to match your cabinets)
- Caulk (paintable, for final touches)
- Soft cloth for cleaning
Having everything ready before you start makes the whole process flow much better. Trust me on this one.
How to Measure End Panels for Kitchen Cabinets
Measuring is the most important step in the entire process. A small measurement error can lead to panels that do not fit, gaps that show, or wasted material. Take your time here, and the rest of the project will go smoothly.
Step-by-Step Measuring Process
Follow these steps to get accurate measurements for your cabinet end panel installation:
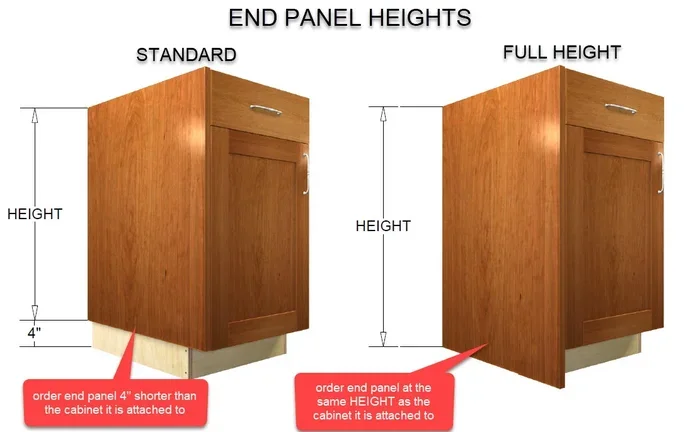
- Measure the height: Measure from the top of the cabinet box to the bottom. Do this at the left side, center, and right side. Use the smallest measurement.
- Measure the depth: Measure from the front edge to the back of the cabinet box.
- Check for obstructions: Look for any shelves, dividers, or hardware that might interfere with the panel.
- Account for the scribe line: If your wall is uneven, you will need extra room for the scribe tool to adjust the panel later.
- Write everything down: Record all measurements and double-check them before cutting.
Remember the golden rule: measure twice, cut once. It sounds cliché, but it saves money and frustration every single time.
Quick Tips for Accurate Measurements
- Always measure in inches and round down slightly for a tighter fit.
- Use a metal tape measure for precision.
- Measure when the cabinets are empty and accessible.
- If you are working with multiple cabinets, measure each one individually. They are rarely perfectly identical.
Cutting End Panels to Size
Once you have your measurements, it is time to cut the panels. This step requires care and attention to safety. A clean cut makes a huge difference in how the final result looks.
Choosing the Right Saw
A circular saw works well for most homeowners. If you have access to a table saw, it gives even cleaner cuts. A jigsaw can work for curved or detailed cuts, but it is not ideal for straight lines.
Cutting Guidelines
- Always wear safety glasses and ear protection.
- Use a straight edge or guide rail to keep cuts straight.
- Cut slowly and let the blade do the work.
- Sand the cut edges with 120-grit sandpaper to remove any roughness.
- Dry-fit the panel before applying any adhesive to check the fit.
If you are not comfortable cutting the panels yourself, most home improvement stores offer cutting services. You can bring your measurements and have them cut the panels for you. This is a great option if you are new to DIY projects.
Step-by-Step Installation Process
Now comes the fun part. You have your panels measured and cut. It is time to install them. Follow these steps carefully for the best results when installing end panels on kitchen cabinets.
Step 1: Prepare the Cabinet Surfaces
Before you attach anything, make sure the cabinet surfaces are clean and dry. Wipe down the sides of the cabinets with a damp cloth. Remove any dust, grease, or debris. A clean surface ensures better adhesion and a smoother finish.
Step 2: Scribe the Panel to the Wall
This step is critical if your wall is not perfectly flat. Use a scribe tool to trace the contour of the wall onto the back of the panel. The scribe tool has a small wheel that follows the wall surface and transfers the shape onto the panel. Then, use a jigsaw to cut along the scribed line. This ensures the panel fits snugly against the wall without gaps.
Step 3: Apply Adhesive
Apply a thin, even layer of panel adhesive or wood glue to the back of the end panel. Use a caulk gun for consistent application. Spread the adhesive with a putty knife or your finger. You want full coverage, but do not apply too much. Excess glue can squeeze out and create a mess.
Step 4: Attach the Panel
Press the panel firmly against the cabinet side. Use clamps to hold it in place while the adhesive sets. If the cabinet has a face frame, you can also use finish nails or brad nails for extra security. Space the nails about 6 to 8 inches apart along the top and bottom edges.
Step 5: Check for Level and Alignment
Use a level to check that the panel is straight. If it is slightly off, gently tap it into place with a rubber mallet. Make sure the panel aligns with the adjacent cabinet doors and drawers. Even a small misalignment can be noticeable once everything is in place.
Step 6: Fill and Finish
Once the adhesive has cured (usually 24 hours), fill any nail holes or gaps with wood filler. Sand the filled areas smooth with 220-grit sandpaper. Then, paint or stain the panel to match your cabinets. Apply a thin layer of paintable caulk along the edge where the panel meets the wall for a seamless look.
Quick Tips for a Professional Finish
- Let the adhesive cure fully before handling the panel.
- Use painter’s tape to protect adjacent cabinet surfaces during finishing.
- Apply caulk in a thin, even bead for the cleanest result.
- If the panel overlaps a cabinet door, make sure it does not interfere with the door swing.
Common Mistakes to Avoid When Installing End Panels
Even with the best instructions, mistakes can happen. Here are the most common errors people make when fitting end panels to kitchen cabinets and how to avoid them.
Skipping the Scribe Step
This is the number one mistake. Walls are rarely perfectly flat. If you do not scribe the panel to match the wall contour, you will end up with visible gaps. Always scribe, even if your wall looks straight. It only takes a few extra minutes and makes a huge difference.
Rushing the Adhesive Cure Time
Panel adhesive needs time to set properly. Clamping the panel for at least 24 hours ensures a strong bond. Removing clamps too early can cause the panel to shift or lift at the edges.
Using the Wrong Type of Adhesive
Not all glues work well on cabinet panels. Regular white glue may not hold up in a kitchen environment with humidity and temperature changes. Use a cabinet-grade panel adhesive designed for bonding to wood and laminate surfaces.
Ignoring the Finish
A panel that is not properly finished will stand out like a sore thumb. Always paint or stain the panel to match your cabinets. Take the extra time to caulk the edge where the panel meets the wall. These small details make the difference between a DIY job and a professional result.
Expert Insights and Pro Tips
Professional cabinet installers have tricks that can save you time and improve your results. Here are some insights from the pros:
- Pre-finish before installation: If possible, paint or stain the panels before you attach them. This gives you better access to edges and corners.
- Use a pin nailer: A pneumatic pin nailer makes fastening panels quick and nearly invisible. The tiny pins are barely visible once filled and painted.
- Check for square: Use a combination square to make sure your cabinet boxes are square before installing panels. Out-of-square cabinets cause panels to fit poorly.
- Work one cabinet at a time: Do not try to install panels on all cabinets at once. Focus on one cabinet, get it right, and then move to the next.
- Keep spare panels: Always keep an extra panel on hand. It is much easier to make adjustments or replacements before everything is in place.
Maintenance Tips for Your New End Panels
Once your kitchen cabinet end panels are installed, a little maintenance goes a long way. Here is how to keep them looking great for years:
- Wipe panels with a damp cloth regularly to remove dust and grease.
- Avoid using harsh chemical cleaners that can damage the finish.
- Check the caulk line once a year and reapply if needed.
- Touch up any chips or scratches promptly to prevent moisture damage.
- Keep panels away from prolonged exposure to water or steam.
With proper care, your end panels will look as good as the day you installed them. They will protect your cabinets and keep your kitchen looking sharp for many years to come.
When to Call a Professional
Most homeowners can handle end panel installation with basic DIY skills. However, there are situations where calling a professional makes sense. If your cabinets are custom-built, if the wall is severely uneven, or if you are working with high-end materials like solid wood or exotic veneers, a professional installer can ensure the best results. It is always okay to ask for help when you need it.
Conclusion
How to install end panels on kitchen cabinets is a skill that any homeowner can learn. It requires basic tools, careful measuring, and a little patience. The results are well worth the effort. Your kitchen will look cleaner, more polished, and more put-together. Whether you are doing a full kitchen renovation or just adding finishing touches, end panels are one of the simplest and most impactful upgrades you can make. Follow the steps in this guide, avoid the common mistakes, and enjoy the satisfaction of a job well done. Your kitchen deserves it.
Frequently Asked Questions
What is the best adhesive for installing kitchen cabinet end panels?
A cabinet-grade panel adhesive or wood glue works best for most applications. Look for products specifically designed for bonding wood, laminate, and cabinet materials. These adhesives provide a strong, durable hold that withstands kitchen conditions like humidity and temperature changes.
Can I install end panels on existing cabinets without removing them?
Yes, you can install end panels on cabinets that are already in place. You do not need to remove them. Just make sure you have good access to the sides of the cabinets, and work carefully around any adjacent cabinets or appliances.
How do I handle uneven walls when installing end panels?
Use a scribe tool to trace the wall contour onto the back of the panel. Then cut along the scribed line with a jigsaw. This technique ensures the panel fits snugly against the wall, even if the wall is not perfectly flat.
What materials are best for kitchen cabinet end panels?
The best material depends on your cabinet style and budget. Veneer panels look natural and classic. Laminate panels are durable and easy to clean. MDF panels work well for painted finishes. Choose a material that matches your existing cabinet construction.
Do I need to paint or stain end panels after installation?
Yes, finishing the panels is recommended for a professional look. Paint or stain them to match your cabinet finish. You can also pre-finish them before installation for easier access to edges and corners.
How long does it take to install end panels on a standard kitchen?
For a standard kitchen with 15 to 20 cabinets, the installation typically takes one to two days. This includes measuring, cutting, scribe work, adhesive application, and finishing. Experienced DIYers may finish faster, while first-timers should allow extra time for learning and adjustments.