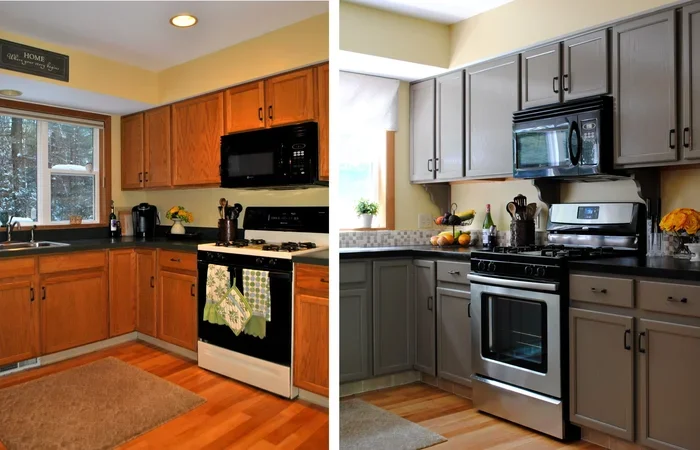

Learning how to paint Ikea kitchen cabinets is easier than most people think. With the right prep, supplies, and a little patience, you can transform your budget cabinets into a custom kitchen look. This guide walks you through every step, from cleaning and sanding to choosing the best paint and avoiding common pitfalls.
Have you ever walked through a kitchen and thought, “I could make this look so much better”? If your Ikea kitchen cabinets feel outdated or just plain boring, you are not alone. Thousands of homeowners every year discover that painting Ikea kitchen cabinets is one of the most impactful and affordable ways to refresh an entire kitchen.
The idea of painting cabinets might feel intimidating at first. But here is the truth: it is a project you can absolutely do yourself. You do not need professional tools or years of experience. You just need the right plan, good supplies, and a weekend or two of focused effort. This guide will show you exactly how to paint Ikea kitchen cabinets the right way, step by step.
By the time you finish reading, you will know what supplies to buy, how to prep your cabinets properly, which paint to choose, and how to avoid the mistakes that trip up most beginners. Let us get into it.
Key Takeaways
- Proper prep is everything: Cleaning, sanding, and priming Ikea cabinets ensures paint adheres smoothly and lasts for years.
- Choose the right paint: Semi-gloss or satin cabinet paint gives a durable, easy-to-clean finish that works beautifully on kitchen surfaces.
- Paint doors separately from boxes: Removing cabinet doors and painting them flat on a table leads to cleaner, more even results.
- Avoid skipping primer: Ikea cabinets have a melamine finish that needs a bonding primer for paint to stick properly.
- Patience pays off: Letting each coat dry fully and light-sanding between coats creates a professional-quality finish at a fraction of the cost.
- Hardware upgrades make a big difference: New knobs and pulls can completely refresh the look of your painted Ikea cabinets.
📑 Table of Contents
- Why Painting Ikea Kitchen Cabinets Is Worth the Effort
- Gathering Your Supplies for Painting Ikea Kitchen Cabinets
- How to Prep Ikea Kitchen Cabinets for Painting
- Step-by-Step: How to Paint Ikea Kitchen Cabinets
- Common Mistakes When Painting Kitchen Cabinets
- How to Keep Your Painted Cabinets Looking Great
- How Long Does It Take to Paint Ikea Kitchen Cabinets?
- Budgeting for Your Cabinet Painting Project
- Color Trends for Painted Kitchen Cabinets in 2024
- Final Thoughts on Painting Ikea Kitchen Cabinets
Why Painting Ikea Kitchen Cabinets Is Worth the Effort
The Appeal of Ikea Cabinets
Ikea cabinets are popular for a reason. They are affordable, they come in flat-pack boxes, and they are easy to install. But there is a downside. The standard finishes on Ikea cabinets, especially the melamine surface, can look a bit cheap over time. The colors are limited, and the flat-pack design does not always scream “custom kitchen.”
That is exactly why so many people turn to kitchen cabinet painting ideas to completely change the feel of their space. A fresh coat of paint can turn a basic Ikea kitchen into something that looks like it came from a high-end design magazine. And the best part? The cost is a tiny fraction of replacing cabinets entirely.
Why People Choose to Paint Their Ikea Cabinets
There are so many reasons to paint your Ikea cabinets. Maybe you bought a fixer-upper with outdated kitchen cabinets. Maybe you got bored of the white gloss finish that was trendy ten years ago. Or maybe you simply want a kitchen cabinet makeover that gives your home more value and personality.
Here are some of the top benefits:
- Cost savings: Painting cabinets costs a fraction of replacing them. New custom cabinets can run thousands of dollars. A paint job can be done for under a few hundred.
- Total style control: You pick the color. You pick the finish. You get exactly the look you want.
- Increased home value: A freshly painted kitchen can boost your home’s appeal if you ever decide to sell.
- Personal expression: Your kitchen should reflect your style. Painting lets you make it truly yours.
If you have been searching for a kitchen refresh on a budget, painting your Ikea cabinets is one of the best returns on investment you can get.
Gathering Your Supplies for Painting Ikea Kitchen Cabinets
Before you start any DIY cabinet painting project, you need to gather your supplies. Having everything ready will save you time and frustration. Trust me, there is nothing worse than stopping halfway through because you forgot to buy something.
Essential Tools and Materials
Here is a checklist of what you will need to paint your Ikea cabinets:
- Screwdriver or drill: You will need this to remove cabinet doors and hardware.
- Tack cloth or damp rags: For wiping down surfaces before painting.
- Sandpaper (220-grit): This helps paint grip the smooth melamine surface.
- Primer: A bonding primer is essential for Ikea cabinets. Look for one specifically designed for melamine or slick surfaces.
- Cabinet paint: More on this below.
- Mini roller and foam roller covers: Rollers give a smoother finish than brushes on flat surfaces.
- Angled paintbrush (2-inch): For edges, corners, and detailed areas.
- Paint tray and liner: For easy access to your paint.
- Painter’s tape: To protect areas you do not want painted.
- Drop cloth or plastic sheeting: To protect your floors and countertops.
- New cabinet hardware (optional): New knobs and pulls can elevate the entire look.
Choosing the Right Paint for Ikea Cabinets
Not all paints are created equal. When it comes to painting kitchen cabinets, you want a paint that is durable, easy to clean, and designed for high-traffic surfaces. Here are your best options:
- Semi-gloss paint: This is the most popular choice for cabinets. It has a slight sheen that resists moisture and wipes clean easily.
- Satin finish: A bit softer than semi-gloss. It looks elegant and still holds up well in kitchens.
- Cabinet-specific paint: Brands like Benjamin Moore, Sherwin-Williams, and Rust-Oleum make paints formulated specifically for cabinets. They go on smoothly and create a tough finish.
- Chalk paint: Some people love the matte, vintage look of chalk paint. Just know that it may need a wax sealant for protection in a kitchen environment.
Avoid using flat or matte paint on cabinets. It shows every flaw and is hard to clean. Stick with semi-gloss or satin for the best results.
How to Prep Ikea Kitchen Cabinets for Painting
Here is where most people rush through or skip entirely. Prep work is the single most important part of how to paint Ikea kitchen cabinets. If you skip this step, your paint will peel, bubble, or look uneven. Do not let that happen to you.
Cleaning and Sanding
Start by removing all cabinet doors, drawers, and hardware. Label each door and its location so reassembly goes smoothly later. A simple numbering system works great.
Next, clean every surface thoroughly. Ikea cabinets accumulate grease, dust, and cooking residue. Use a degreaser or a mix of warm water and dish soap. Wipe down every door, drawer front, and cabinet box. Let everything dry completely.
Now it is time to sand. Ikea cabinet surfaces are smooth melamine, which paint does not love to stick to. Lightly sand every surface with 220-grit sandpaper. You are not trying to strip the finish. You just want to create a slightly rough texture that helps the primer and paint grip. Wipe away all dust with a tack cloth when you are done.
Priming for Success
Once your cabinets are clean and sanded, apply a coat of bonding primer. This is non-negotiable for Ikea cabinets. The primer creates a bridge between the slick melamine surface and the paint.
Use a mini roller for flat surfaces and an angled brush for edges. Apply thin, even coats. Let the primer dry fully according to the manufacturer’s instructions. Most bonding primers need at least one to two hours between coats. Apply one to two coats of primer depending on the coverage.
Quick Tip: If you are painting light-colored cabinets, one coat of primer is usually enough. Darker colors may need two coats for full coverage and to prevent bleed-through.
Step-by-Step: How to Paint Ikea Kitchen Cabinets
Now comes the fun part. You have your prepped, primed cabinets ready. Let us talk about the actual painting process.
Painting Cabinet Doors
Lay your cabinet doors flat on a table or workbench covered with a drop cloth. Painting them flat gives you the most even results. It also prevents paint from dripping onto the face frame.
Use a mini foam roller for the large flat areas. Roll in thin, even strokes. Then use your angled brush to get into corners, edges, and any recessed areas. Apply the first coat and let it dry completely. Most cabinet paints need two to four hours between coats.
Once the first coat is dry, lightly sand the surface with 320-grit sandpaper. This smooths out any tiny imperfections. Wipe away the dust. Then apply your second coat. For a really smooth finish, a third coat can make a big difference.
Painting Cabinet Boxes
Painting the cabinet boxes is similar but a bit trickier because they are already installed. If you can remove the boxes, that is ideal. But if not, you can paint them in place.
Use painter’s tape to protect the walls, countertops, and floors. Roll the paint onto the flat surfaces of each box. Use your brush for edges and corners. Apply thin coats and let them dry fully between applications.
Expert Insight: Many professional painters recommend painting the inside of cabinets a different color or leaving them the original Ikea color. This saves time and still gives a polished look from the front.
Reassembling and Adding Hardware
Once all your pieces are fully dry, it is time to put everything back together. Reattach the doors to the boxes using your labels to guide you. Install new hardware if you decided to upgrade. New knobs and pulls are a simple way to complete your kitchen cabinet transformation and give the whole kitchen a polished, cohesive look.
Common Mistakes When Painting Kitchen Cabinets
Skipping the Prep Work
This is the number one mistake people make. They want to get to the painting so badly that they skip cleaning, sanding, and priming. The result? Paint that peels, chips, or looks rough within months. Do not shortcut the prep. It is the foundation of a great finish.
Using the Wrong Paint
Regular wall paint is not the same as cabinet paint. Wall paint is too thin and does not hold up to the daily wear and tear of kitchen use. Always use a paint specifically formulated for cabinets or trim. It will be more durable, easier to clean, and much more forgiving to apply.
Applying Paint Too Thick
Thick coats lead to drips, runs, and uneven drying. Instead, apply multiple thin coats. Each thin coat dries faster, adheres better, and creates a smoother finish. Patience here makes all the difference.
Not Letting Paint Dry Fully
It can be tempting to reassemble your cabinets too soon. But if the paint is not fully cured, you risk scratches, dents, and sticking. Most cabinet paints need 24 to 48 hours to dry between coats and up to a week to fully cure. Give it the time it needs.
How to Keep Your Painted Cabinets Looking Great
Cleaning Tips for Painted Cabinets
Once your cabinets are painted and reassembled, you want them to last. Cleaning painted cabinets is simple. Use a soft, damp cloth with mild soap. Avoid harsh abrasive cleaners or scrub pads that can scratch the finish. Wipe up spills quickly, especially in the kitchen where grease and moisture are constant.
Touch-Up Strategies
Over time, you may notice small chips or scratches. Keep a small container of your leftover paint for touch-ups. Use a small brush to fill in any spots. For minor scuffs, a quick wipe with a damp cloth often does the trick.
Quick Tip: If your cabinets get a lot of daily use, consider applying a clear polyurethane topcoat after the final paint coat. This adds an extra layer of protection and makes cleaning even easier.
How Long Does It Take to Paint Ikea Kitchen Cabinets?
The timeline depends on the size of your kitchen and how many cabinets you have. For a small to medium kitchen, plan for one to two days of work spread across a weekend. That includes prep, priming, painting, and drying time. Larger kitchens may need an extra day or two.
Remember that drying time is the biggest factor. You cannot rush the coats. If you try to speed things up, you risk smudges, imperfections, and a finish that does not last. Give yourself grace and let the paint do its thing.
Budgeting for Your Cabinet Painting Project
One of the best things about learning how to paint Ikea kitchen cabinets is how affordable it is. A typical budget breakdown looks like this:
- Primer: $25 to $40 for a quart, which covers most kitchens.
- Cabinet paint: $30 to $60 per quart. Most kitchens need two to three quarts total.
- Supplies (rollers, brushes, tape, drop cloth): $30 to $50.
- Sandpaper and tack cloth: Under $15.
- New hardware (optional): $20 to $100 depending on style.
All in, you can expect to spend between $150 and $300 for a full kitchen cabinet paint job. Compare that to the $5,000 or more it would cost to replace cabinets, and the savings are obvious.
Color Trends for Painted Kitchen Cabinets in 2024
If you are still deciding on a color, here are some popular options for painted kitchen cabinets this year:
- Soft white: A warm, creamy white that feels modern and inviting.
- Sage green: A trendy, earthy tone that adds calm and sophistication.
- Navy blue: Bold and dramatic. Navy cabinets create a stunning focal point.
- Warm gray: A neutral, versatile choice that pairs with almost any countertop and backsplash.
- Black: For a sleek, modern look. Black cabinets make a strong statement.
When choosing your color, grab a sample pot and paint a small test area on one of your cabinet doors. Look at it in different lighting throughout the day before committing to the whole kitchen.
Final Thoughts on Painting Ikea Kitchen Cabinets
Learning how to paint Ikea kitchen cabinets is one of the most rewarding DIY projects you can tackle. It transforms your kitchen, saves you money, and gives you complete creative control over the final look. The process is straightforward when you follow the right steps: prep, prime, paint, and protect.
Take your time with the prep work. Choose a quality cabinet paint. Apply thin, even coats and let them dry fully. And do not be afraid to add your own personal touch, whether that is a bold color, new hardware, or a two-tone design.
Your kitchen is the heart of your home. It deserves to look the way you want it to. With a little effort and the right approach, your painted Ikea cabinets will look like they cost a fortune. And the best part? You did it yourself.
Now go grab your supplies and get started. Your dream kitchen is just a weekend away.
Frequently Asked Questions
Can I paint Ikea kitchen cabinets without sanding?
You can, but sanding is highly recommended. Ikea cabinets have a smooth melamine finish that paint struggles to grip. Light sanding with 220-grit creates a texture that helps primer and paint adhere much better. Skipping sanding increases the risk of peeling and chipping over time.
What is the best paint for painting Ikea kitchen cabinets?
Semi-gloss or satin cabinet-specific paints work best. Brands like Benjamin Moore, Sherwin-Williams, and Rust-Oleum offer excellent cabinet paints. These formulas are designed to be durable, easy to clean, and smooth to apply on kitchen surfaces.
Do I need to remove cabinet doors to paint them?
Yes, removing doors gives the best results. When doors are flat on a table, you get even coverage without drips or brush marks. It also lets you paint edges and details more easily. Removing doors takes extra time but makes a big difference in the final finish.
How many coats of paint do I need on my cabinets?
Two to three coats of paint is the sweet spot. The first coat covers the primer and any existing color. The second coat provides solid, even coverage. A third coat adds extra durability and a smoother, more professional look. Always let each coat dry fully before applying the next.
Can I paint Ikea cabinets without primer?
You should not skip primer on Ikea cabinets. The melamine surface is slick and non-porous, which means regular paint will not stick well. A bonding primer creates the surface texture paint needs to adhere properly and last for years without peeling.
How long does painted Ikea cabinet paint take to cure?
Most cabinet paints are dry to the touch within two to four hours between coats. However, full cure time is usually seven to fourteen days. During this curing period, avoid heavy use of the cabinets and be gentle when opening and closing doors to prevent scratches or dents.