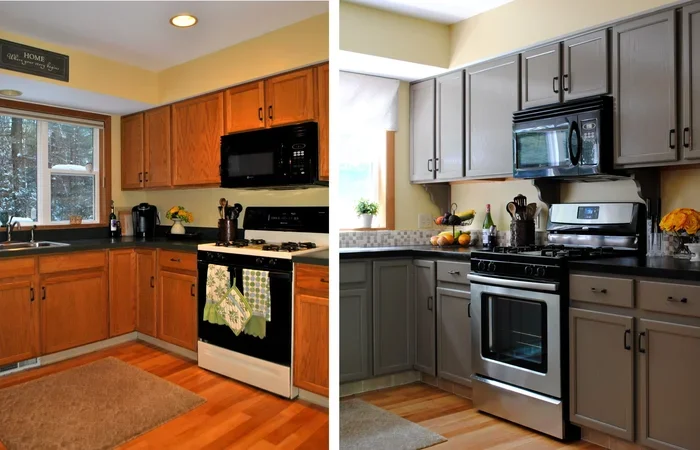


Yes, you absolutely can paint wood kitchen cabinets and achieve a beautiful, professional-looking finish. This guide walks you through every step from prep work to final coat so your kitchen cabinet makeover is a success. You will learn the right paints, tools, and techniques that save time and money. Follow along and transform your outdated kitchen into a fresh, stylish space.
Have you been staring at your kitchen lately thinking it looks tired and outdated? You are not alone. Many homeowners love their kitchen layout but hate the color or condition of their cabinets. The good news is that you can paint wood kitchen cabinets and completely change the look of your space. It is one of the most affordable ways to give your kitchen a fresh new feel.
A kitchen cabinet makeover does not require a huge budget or professional help. With some basic tools, a weekend of work, and a little patience, you can achieve stunning results. This guide will show you exactly how to get started. We will cover everything from preparation to the final coat so you feel confident tackling this project yourself.
Before you dive in, let us talk about why painting cabinets is such a popular choice. When you refresh your kitchen with a new paint color, the entire room transforms. It feels like a whole new home without the massive expense of a full renovation. Whether you want a sleek white look or a bold statement color, painting your cabinets makes it possible.
Key Takeaways
- Wood cabinets are paintable: Most wood kitchen cabinets can be painted with the right prep and materials.
- Sanding and priming are essential: Skipping these steps leads to peeling and uneven finishes.
- Chalk paint and latex paint work best: They offer smooth coverage and easy application.
- Remove doors and hardware: Painting cabinet doors separately gives a cleaner, more professional result.
- Budget-friendly transformation: Painting cabinets costs a fraction of replacing them.
- Durability matters: Use a quality topcoat to protect your finish from daily wear and moisture.
- Patience pays off: Allow proper drying time between coats for the best results.
📑 Table of Contents
- Why Paint Your Wood Kitchen Cabinets?
- Can You Paint Any Wood Cabinet?
- What You Need to Get Started
- Step-by-Step Guide to Painting Wood Kitchen Cabinets
- Common Mistakes to Avoid When Painting Cabinets
- Expert Tips for a Flawless Cabinet Paint Job
- How Long Does the Project Take?
- Cost Breakdown for Painting Kitchen Cabinets
- When Should You Call a Professional Instead?
- Conclusion
Why Paint Your Wood Kitchen Cabinets?
There are many reasons homeowners choose to paint their cabinets. Let us explore the biggest benefits that make this project so worthwhile.
It Saves You Money
Replacing kitchen cabinets can cost thousands of dollars. A full cabinet swap with new materials and installation often runs five to fifteen thousand dollars. On the other hand, painting wood kitchen cabinets costs a fraction of that. You can complete the entire project for anywhere from two hundred to eight hundred dollars depending on the size of your kitchen. That is a huge savings.
It Gives You Total Control Over the Look
When you buy new cabinets, you are limited to the colors and styles available at the store. But when you paint them yourself, you choose the exact shade you love. You can match your kitchen to your personal style perfectly. Want a classic white? A trendy gray? A bold navy? The choice is entirely yours when you take on a cabinet transformation project.
It Increases Your Home Value
A freshly painted kitchen can boost your home curb appeal significantly. Potential buyers notice kitchens first. When your cabinets look clean and updated, the whole room feels modern and well cared for. This is one of the best budget kitchen update ideas you can invest in before selling your home.
Can You Paint Any Wood Cabinet?
The short answer is yes, with a few exceptions. Most wood cabinets respond well to paint. But the type of wood, finish, and condition all matter. Let us break this down so you know exactly what to expect.
Solid Wood Cabinets
Solid wood cabinets are the best candidates for painting. They have a natural texture that holds paint beautifully. Oak, maple, birch, and pine all work well. If your cabinets are solid wood, you are in great shape for a successful paint job.
Laminate or Veneer Cabinets
Some cabinets have a thin wood veneer over particle board or MDF. These can still be painted, but they need extra prep work. The smooth surface does not grip paint as easily. You will need to sand the surface thoroughly and use a high-quality primer designed for slick surfaces. Do not skip this step or the paint may peel over time.
Cabinets in Poor Condition
If your cabinets are badly damaged, warped, or have deep water stains, painting may not be the best fix. Paint highlights imperfections rather than hiding them. In these cases, you might want to consider cabinet refacing instead. This involves replacing just the cabinet doors and drawer fronts while keeping the existing boxes. It gives a fresh look without the full cost of replacement.
What You Need to Get Started
Gathering the right tools and materials before you begin makes the whole process smoother. Here is a complete list of what you need for your kitchen cabinet makeover.
Paint Options
Choosing the right paint is one of the most important decisions you will make. Not all paints work equally well on cabinets. Here are the top options to consider.
- Chalk paint: This is a popular choice for cabinets because it goes on smoothly and requires minimal prep. Brands like Annie Sloan and Rust-Oleum Chalked are widely available. Chalk paint gives a matte, vintage look that many homeowners love.
- Latex paint: Water-based latex paint is durable, easy to clean up, and dries quickly. It is a great everyday option for kitchen cabinets. Look for a satin or semi-gloss finish for the best durability in a kitchen environment.
- Acrylic-latex blend: This combines the durability of acrylic with the easy cleanup of latex. It resists moisture and scrubbing well, which is essential in a kitchen.
- Spray paint: If you are painting cabinet doors, a paint sprayer or spray cans can give you a smooth, even finish fast. This method works best outdoors or in a well-ventilated area.
Primer
Do not skip the primer. A good primer for cabinets helps the paint adhere properly and prevents bleed-through from old stains or discoloration. Look for a bonding primer specifically designed for kitchen cabinets. Zinsser and KILZ both make excellent options that pros recommend.
Tools and Supplies
Here is what else you will need to gather before starting your project:
- Sandpaper in 120-grit and 220-grit
- A sanding block or orbital sander
- Tack cloth or damp rags
- High-quality angled paintbrush (2-inch)
- Small foam rollers for smooth application
- Cabinet door hinges and a screwdriver
- Paint trays and liners
- Drop cloths or plastic sheeting
- Painter’s tape
- Wood filler for any dents or holes
- A putty knife
Step-by-Step Guide to Painting Wood Kitchen Cabinets
Now comes the fun part. Let us walk through the actual process of painting your cabinets. Follow these steps in order for the best possible outcome.
Step 1: Remove All Cabinet Doors and Hardware
Start by taking off every cabinet door, drawer front, and pull. Use a screwdriver to carefully remove the hinges. Label each door and its corresponding location with painter’s tape or a marker. This sounds tedious, but it saves a lot of confusion later when you are putting everything back together.
Remove all cabinet hardware including knobs and pulls. Place them in a small bag or container so nothing gets lost. This is also a great time to clean the hardware with warm soapy water. Set everything aside to dry completely.
Step 2: Clean the Cabinets Thoroughly
Kitchen cabinets accumulate grease and grime over time, especially near the stove. Before you paint, you need a clean surface. Use a degreaser or a mixture of warm water and dish soap. Wipe down every surface including the inside of cabinets, the frames, and all the doors.
Let everything dry fully. Any remaining moisture or grease will prevent the paint from sticking properly. This step is not glamorous, but it is absolutely critical for a lasting finish.
Step 3: Sand the Surfaces
Sanding is the step most people want to skip, but it makes a huge difference. Use 120-grit sandpaper to lightly scuff all surfaces. You are not trying to strip the old finish completely. You just want to create a slightly rough texture that helps the paint grip the surface.
After the initial sanding, go over everything again with 220-grit sandpaper for a smoother finish. Wipe away all dust with a tack cloth or a damp rag. Proper sanding and dust removal is the secret to a professional-looking paint job.
Step 4: Apply Wood Filler and Touch Up
Inspect all surfaces for dents, scratches, or holes. Use wood filler to fill any imperfections. Let it dry completely, then sand it smooth with 220-grit sandpaper. This step ensures your finished surface looks flawless and even.
Step 5: Prime the Cabinets
Now apply a thin, even coat of primer. Use your angled brush for edges and corners and a small foam roller for flat surfaces. Work in sections and avoid applying too much primer at once. Thick coats take longer to dry and can drip.
Let the primer dry according to the manufacturer’s instructions. Most primers need at least one to two hours. Once dry, lightly sand again with 220-grit sandpaper and wipe away dust. This creates the perfect surface for your paint to adhere to.
Step 6: Apply the First Coat of Paint
Start painting with your chosen color. Use smooth, even strokes following the direction of the wood grain. Apply a thin first coat and do not overwork the paint. Thin coats dry faster and look much better than thick, drippy ones.
Let the first coat dry completely. This usually takes two to four hours depending on the paint type and your humidity level. Check the paint can label for specific drying times.
Step 7: Sand and Apply the Second Coat
Lightly sand the first coat with 220-grit sandpaper to smooth out any small imperfections. Wipe away the dust. Then apply your second coat of paint the same way you did the first. Most cabinet projects need two to three coats for full, even coverage.
Step 8: Apply a Topcoat or Sealant
For extra durability, especially in a high-use kitchen, apply a clear topcoat or sealant. This protects the paint from moisture, scratches, and daily wear. A water-based polyurethane or a cabinet-specific topcoat works great. Apply one to two thin coats and let each dry completely between applications.
Step 9: Reassemble Everything
Once all the paint is fully cured, which usually takes about three to seven days, you can reattach your cabinet doors and hardware. Use your labels to match each door to its correct location. Reinstall all hinges and knobs carefully. Step back and admire your handiwork.
Common Mistakes to Avoid When Painting Cabinets
Even with the best intentions, mistakes happen. Here are the most common errors people make when painting wood kitchen cabinets and how to avoid them.
- Skipping the sanding step: Paint needs texture to stick. Without sanding, it will peel and flake within weeks.
- Using the wrong primer: Regular wall primer does not work well on cabinets. Use a bonding primer made specifically for kitchen surfaces.
- Applying too-thick coats: Thick paint drips, bubbles, and takes forever to dry. Thin, even coats always produce better results.
- Not letting coats dry fully: Rushing between coats leads to tacky, uneven surfaces. Always wait for the recommended drying time.
- Painting without removing doors: It is tempting to paint cabinets while they are still hung. But you will get brush strokes and uneven coverage. Removing doors gives you a much cleaner finish.
- Ignoring the inside of cabinets: If you can see inside your cabinets when they are open, paint them too. A half-finished job shows and looks sloppy.
Expert Tips for a Flawless Cabinet Paint Job
Here are some insider tips from experienced painters that will help you achieve the best possible results.
- Use a paint sprayer for cabinet doors: If you have access to a small paint sprayer, use it on the doors. It creates an incredibly smooth finish that is hard to achieve with a brush alone.
- Paint in a well-ventilated area: Set up a painting station in your garage or outside if possible. Good airflow helps paint dry faster and reduces fumes.
- Invest in quality brushes: Cheap brushes leave streaks and shed bristles. A good quality angled sash brush makes all the difference in the final look.
- Keep a wet edge: When painting large flat surfaces, work in sections and keep a wet edge to avoid visible brush marks and lap marks.
- Consider chalk paint for a rustic look: Chalk paint gives a beautiful matte finish that looks stunning in farmhouse and cottage-style kitchens. It also requires less prep work than traditional paint.
How Long Does the Project Take?
The total timeline depends on the size of your kitchen and how many cabinets you have. On average, here is what to expect:
- Prep work and cleaning: Half a day
- Priming and first paint coat: One day with drying time
- Second and third paint coats: One to two days with drying time
- Topcoat and curing: Two to three days
Most homeowners can complete a full kitchen cabinet makeover over a weekend or spread it across two weekends if they prefer a more relaxed pace. The key is to not rush the drying times. Patience is your best friend in this project.
Cost Breakdown for Painting Kitchen Cabinets
One of the biggest advantages of painting cabinets is the affordability. Here is a rough cost breakdown for a typical kitchen with about twenty cabinets.
| Item | Estimated Cost |
|---|---|
| Paint (1-2 quarts) | $40-$80 |
| Primer (1 quart) | $20-$35 |
| Sandpaper and supplies | $15-$25 |
| Brushes and rollers | $15-$30 |
| Hardware (if replacing) | $20-$50 |
| Total estimated cost | $110-$220 |
Compare that to the thousands of dollars it costs to replace cabinets entirely. Painting your wood kitchen cabinets is clearly the smarter financial choice for most homeowners.
When Should You Call a Professional Instead?
Painting cabinets is a very doable DIY project for most people. But there are situations where hiring a professional makes sense. If your cabinets have significant structural damage, deep water damage, or complex glass-front doors, a professional may deliver better results. Also, if you have zero painting experience and feel overwhelmed, it is okay to hire help. A professional cabinet painting service can transform your kitchen while you avoid the stress of doing it yourself.
Conclusion
The answer to the question can you paint wood kitchen cabinets is a resounding yes. With the right preparation, quality materials, and a little patience, you can completely transform your kitchen on a modest budget. From thorough cleaning and sanding to priming and multiple paint coats, each step plays a vital role in achieving a beautiful, long-lasting finish.
Remember that the key to a successful cabinet painting project lies in the details. Do not rush the prep work. Use the right primer and paint. Apply thin, even coats and allow proper drying time between each layer. These cabinet painting tips will help you avoid common pitfalls and achieve results that look professional and last for years.
Your kitchen is the heart of your home. It deserves to look and feel amazing. So grab your supplies, roll up your sleeves, and start your kitchen cabinet makeover today. You will be amazed at what a fresh coat of paint can do. The transformation is truly incredible, and you will love walking into your refreshed kitchen every single morning.
Frequently Asked Questions
Do I need to sand my cabinets before painting?
Yes, sanding is essential. It creates a slightly rough surface that helps the primer and paint adhere properly. Without sanding, the paint is likely to peel or flake off over time. Even if your cabinets have a smooth finish, a light scuff with 120-grit sandpaper makes a big difference.
Can I paint cabinets without removing the doors?
You can, but it is not recommended. Painting doors while they are attached often leads to uneven coverage and brush strokes. Removing the doors gives you full access to every surface and allows you to paint them flat for a much smoother finish. It also makes reassembly easier.
How many coats of paint do kitchen cabinets need?
Most cabinet projects require two to three coats of paint after the primer. The first coat acts as a base, the second provides solid color, and a third coat ensures full, even coverage. Always let each coat dry completely before applying the next one.
What is the best paint for kitchen cabinets?
Chalk paint and acrylic-latex blends are the top choices for kitchen cabinets. Chalk paint is easy to apply and gives a beautiful matte finish. Acrylic-latex paint offers excellent durability and moisture resistance, which is important in a kitchen environment. Choose a satin or semi-gloss finish for the best results.
How long should I wait before using my cabinets after painting?
Let the paint cure for at least three to seven days before putting items back in your cabinets. While the paint may feel dry to the touch within a few hours, it needs full curing time to become hard and durable. Using the cabinets too soon can cause dents and marks in the fresh paint.
Is it cheaper to paint cabinets or buy new ones?
Painting cabinets is significantly cheaper than buying new ones. A full cabinet replacement can cost anywhere from five thousand to fifteen thousand dollars. Painting your existing cabinets typically costs between one hundred and three hundred dollars for materials. It is one of the most cost-effective kitchen upgrades you can make.