
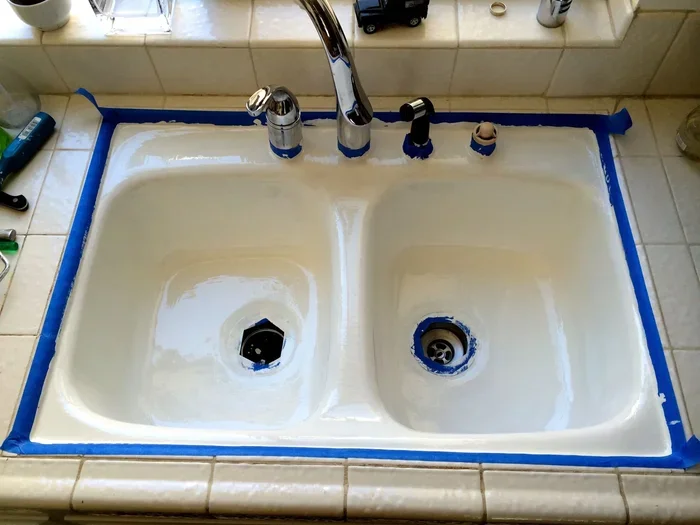

Painting your kitchen sink is a budget-friendly way to refresh your kitchen without a full renovation. With the right primer, paint, and a little patience, you can give your sink a stunning new finish that looks professional. This guide walks you through every step, from prep work to the final seal, so your kitchen sink makeover lasts for years.
Your kitchen sink takes a beating every single day. It handles hot water, soap, food scraps, and whatever else you throw at it. Over time, stains, chips, and dullness can make even the nicest kitchen feel dated. But here is the good news. You do not need to spend thousands on a full kitchen remodel to get that fresh look you want.
Painting a kitchen sink is one of the easiest and most affordable ways to transform your space. Whether you have a porcelain sink, a stainless steel sink, or even a fiberglass one, the right approach can give you stunning results. In this guide, we will walk you through the entire process step by step. You will learn what supplies you need, how to prep your sink, which paint to use, and how to seal everything for a long-lasting finish.
By the time you are done reading, you will feel confident enough to tackle this project yourself. No professional skills required. Just a weekend, some basic tools, and a little elbow grease. Let us get started on your kitchen sink makeover.
Key Takeaways
- Proper prep is everything: Cleaning, sanding, and priming your sink before painting ensures the paint adheres and lasts.
- Use epoxy or spray paint designed for sinks: Regular paint will chip and peel quickly in a wet environment.
- Curing time matters: Let your painted sink cure fully before using it to avoid damage.
- Seal with a clear topcoat: A waterproof sealant protects your new finish from water stains and scratches.
- Avoid common mistakes: Skipping primer, painting a dirty sink, or rushing the drying process are the top reasons paint jobs fail.
- Pair with other kitchen updates: A freshly painted sink works great alongside other budget-friendly upgrades like trying an egg in a bagel hole for a quick kitchen refresh.
📑 Table of Contents
- Why Paint Your Kitchen Sink?
- Gathering Your Supplies for a Kitchen Sink Paint Job
- Step-by-Step Guide to Painting Your Kitchen Sink
- Choosing the Right Color for Your Painted Sink
- Common Mistakes to Avoid When Painting a Sink
- How Long Does a Painted Kitchen Sink Last?
- When Should You Call a Professional Instead?
- Final Thoughts on Painting a Kitchen Sink
Why Paint Your Kitchen Sink?
Before we dive into the how-to, let us talk about why painting a sink makes so much sense. There are several reasons homeowners choose this route over replacing the entire fixture.
It Saves You Money
A brand-new kitchen sink can cost anywhere from $200 to $800 or more, depending on the material and brand. Add in installation costs, and you could easily spend over $1,000. Painting your existing sink costs a fraction of that. A can of sink-safe paint and primer typically runs between $30 and $60. You can do the whole project for under $100.
It Fits Any Kitchen Style
Painting lets you choose any color you want. Want a sleek matte black kitchen sink? Go for it. Prefer a soft white or a trendy navy? You can make it happen. This level of customization is hard to find when buying a new sink off the shelf.
It Is Eco-Friendly
Replacing a sink means manufacturing a new one, shipping it, and eventually disposing of the old one. Repainting keeps materials out of landfills and reduces waste. It is a small but meaningful step toward a more sustainable kitchen.
Gathering Your Supplies for a Kitchen Sink Paint Job
Having the right tools and materials before you start makes all the difference. Here is everything you will need to gather before you begin your kitchen sink refinishing project.
Tools You Will Need
- Fine-grit sandpaper (220-grit or higher)
- Tack cloth or lint-free rags
- Painter’s tape for masking off areas
- Small foam rollers or high-quality brushes
- Spray paint cap or nozzle for even application
- Rubber gloves and a dust mask
- Drop cloth or newspaper to protect your countertop
- Soft cloths for cleaning
Paint and Primer Options
Not all paints are created equal. For a kitchen sink, you need products that can handle constant exposure to water, heat, and cleaning chemicals. Here are your best options:
- Epoxy sink paint: This is the gold standard for painted sinks. It bonds strongly to most surfaces and resists water damage. Brands like Rust-Oleum and Porcelain Magic make excellent options.
- Spray paint for sinks: If you want a smooth, even finish with minimal effort, a quality spray paint designed for bathrooms and kitchens works great.
- Brush-on epoxy: This gives you more control and is ideal for getting into corners and around faucet handles.
For primer, always choose a bonding primer designed for wet areas. Regular primer will not hold up in a sink environment. Look for products labeled for bathroom or kitchen use.
Step-by-Step Guide to Painting Your Kitchen Sink
This is the core of your project. Follow these steps carefully, and you will get professional-quality results. Take your time with each stage. Rushing through the process is the number one reason paint jobs fail early.
Step 1: Clean the Sink Thoroughly
Start by removing everything from your sink. Take out the drain strainer, faucet accessories, and any removable parts. Wash the entire sink with a degreaser or a mixture of warm water and dish soap. Pay special attention to the areas around the faucet and drain. Grease and soap scum will prevent paint from sticking.
After washing, rinse thoroughly and dry completely. Use a tack cloth to pick up any remaining dust or debris. Your sink surface needs to be completely clean and dry before you move to the next step.
Step 2: Sand the Surface
Sanding creates a rough surface that helps the paint grip. Use fine-grit sandpaper (220-grit or higher) and sand the entire sink gently. You do not need to strip the old finish completely. Just create enough texture for the new paint to adhere to.
After sanding, wipe the sink down again with a tack cloth. Remove every bit of dust. Even a tiny particle can cause bumps in your final finish.
Step 3: Mask Off Areas You Do Not Want to Paint
Use painter’s tape to protect the faucet, drain, countertop edges, and any surrounding areas. Press the tape down firmly to prevent paint from seeping underneath. This step takes a few extra minutes but saves you from frustrating cleanup later.
Step 4: Apply the Primer
Priming is not optional. A good bonding primer creates a solid foundation for your paint. Apply a thin, even coat using a foam roller or a quality brush. Work in smooth, overlapping strokes to avoid streaks.
Let the primer dry completely. Most bonding primers need at least 1 to 2 hours, but check the label on your specific product. Humidity and temperature can affect drying time, so be patient.
Step 5: Paint the Sink
Now comes the fun part. Apply the first coat of your chosen sink paint in thin, even layers. If you are using spray paint, hold the can about 10 to 12 inches from the surface and use sweeping motions. If you are using brush-on paint, use a small foam roller for the flat areas and a brush for corners and edges.
Let the first coat dry according to the manufacturer’s instructions. Then apply a second coat. Most kitchen sink paint projects need two to three coats for full coverage and a smooth finish.
Step 6: Let It Cure
Here is where most people make mistakes. Painting and curing are two different things. The paint may feel dry to the touch in a few hours, but it needs much longer to fully cure. Most epoxy sink paints require 48 to 72 hours of curing time before you can use the sink again.
During this time, keep the area well-ventilated. Do not turn on the water, and keep pets and children away from the sink.
Step 7: Seal the Finish
Once the paint has fully cured, apply a clear waterproof sealant. This adds an extra layer of protection against water spots, scratches, and daily wear. A non-slip sink coating sealant is a great choice because it also makes the sink surface less slippery when wet.
Apply the sealant in thin coats and let it dry completely between applications. Two coats usually provide the best protection.
Choosing the Right Color for Your Painted Sink
Color selection can make or break the look of your kitchen sink makeover. Here are some popular options and what they work best with:
- Matte black: A timeless choice that pairs beautifully with modern and farmhouse kitchen styles. It hides water spots well and looks sleek against white countertops.
- Classic white: If you want your sink to blend seamlessly with your cabinets and backsplash, white is always a safe and elegant option.
- Navy blue: For a bold, statement-making look. Navy sinks work wonderfully in farmhouse and coastal kitchen designs.
- Soft gray: A subtle, sophisticated choice that fits almost any kitchen style without drawing too much attention.
When choosing your color, consider your kitchen design trends and the colors of your countertops, cabinets, and backsplash. You want the sink to complement the overall look, not clash with it.
Common Mistakes to Avoid When Painting a Sink
Even with the best intentions, it is easy to make mistakes that compromise your finish. Here are the most common ones and how to avoid them.
Skipping the Sanding Step
Some people think they can just clean the sink and start painting. This is a recipe for disaster. Without sanding, the paint has nothing to grip onto, and it will peel within days. Always sand, even if the surface looks smooth.
Using the Wrong Type of Paint
Regular wall paint or craft paint will not survive in a wet sink environment. You need paint specifically formulated for wet areas. Epoxy-based sink paint is your best bet for durability and water resistance.
Applying Paint Too Thick
Thick coats lead to drips, bubbles, and an uneven finish. Apply thin coats instead and build up coverage gradually. You will get a much smoother result.
Not Letting the Paint Cure Fully
Using your sink too soon after painting is one of the fastest ways to ruin your hard work. Wait at least 48 to 72 hours before running water in the sink. For the first week, avoid harsh scrubbing or abrasive cleaners.
Forgetting to Seal the Finish
Paint alone is not enough to protect your sink from daily use. A clear sealant adds a protective barrier that extends the life of your paint job significantly. Do not skip this step.
How Long Does a Painted Kitchen Sink Last?
A well-done painted sink can last anywhere from 5 to 10 years with proper care. The key factors that determine longevity include the quality of paint you use, how well you prep the surface, and how diligently you maintain the finish.
To maximize the lifespan of your painted sink, follow these simple tips:
- Use gentle, non-abrasive cleaners when washing the sink.
- Avoid dropping heavy metal objects directly into the sink.
- Wipe up standing water after use to prevent water spots.
- Reapply the sealant every 1 to 2 years for added protection.
- If you notice small chips or wear, touch them up promptly with matching paint.
If you are also refreshing other parts of your kitchen, consider pairing your sink update with other budget-friendly upgrades. For quick breakfast ideas while your sink cures, try making an egg in a bagel hole on the stove or in the microwave. It is a fun and easy way to enjoy the kitchen while your project comes together.
When Should You Call a Professional Instead?
Painting a kitchen sink is a great DIY project for most homeowners. However, there are situations where calling in a professional makes more sense.
- Deep cracks or damage: If your sink has significant cracks, chips, or structural damage, painting alone will not fix the problem. A professional can assess whether repair or replacement is needed.
- Extensive rust or corrosion: Heavy rust may require specialized treatment that goes beyond a simple paint job.
- No time or patience: If you are short on time or prefer not to tackle a multi-day project, a professional sink refinishing service can deliver great results in a single visit.
Professional sink resurfacing typically costs between $300 and $600, which is still less than a full sink replacement. It is worth exploring if DIY is not your thing.
Final Thoughts on Painting a Kitchen Sink
There you have it. A complete guide to giving your kitchen sink a brand-new look without the high cost of replacement. From gathering your supplies to the final seal, every step matters. The key to a successful kitchen sink makeover is patience and attention to detail.
Take your time with the prep work. Choose the right paint and primer. Apply thin, even coats. And most importantly, let everything cure fully before you start using the sink again. Follow these guidelines, and you will have a beautiful, refreshed sink that looks like it came straight from a showroom.
A painted sink is just one part of a larger kitchen refresh. If you are looking for more easy ways to update your space, explore our other guides and tips for budget-friendly kitchen transformations. Your dream kitchen is closer than you think.
Frequently Asked Questions
Can I paint any type of kitchen sink?
Most sinks can be painted, including porcelain, fiberglass, and some stainless steel sinks. The key is proper surface preparation. Make sure the sink is clean, dry, and lightly sanded before you apply primer and paint. Avoid painting sinks with deep cracks or significant structural damage, as the paint will not hold on compromised surfaces.
How long should I wait before using my painted sink?
Wait at least 48 to 72 hours before running water in your freshly painted sink. The paint may feel dry to the touch within a few hours, but it needs full curing time to harden properly. Using the sink too early can cause chips, scratches, and peeling. Be patient and let the paint cure completely for the best results.
What type of paint works best for kitchen sinks?
Epoxy-based sink paint is the best option for most kitchen sinks. It bonds strongly to the surface, resists water damage, and withstands daily use. Spray paints specifically formulated for bathrooms and kitchens are also excellent choices. Avoid using regular wall paint or craft paint, as these will not hold up in a wet environment.
Do I need to remove the faucet before painting?
Yes, you should remove any removable parts like the drain strainer, faucet handles, and aerator. If the faucet cannot be removed, use painter’s tape to carefully mask it off. Protecting these areas ensures clean lines and prevents paint from getting where it should not be. Take your time with masking for the best finish.
Will the paint peel or chip over time?
With proper preparation and the right products, a painted sink can last 5 to 10 years without peeling. The most common reasons paint peels are skipping the primer, using the wrong type of paint, or not letting the sink cure fully. Follow all the steps in this guide, and your paint job should stay beautiful for years.
Can I change the color of my painted sink later?
Yes, you can repaint your sink with a different color at any time. Simply sand the existing paint lightly to create texture, clean the surface, apply primer, and paint over it with your new color. This makes painted sinks a great option if you ever want to update your kitchen style again without replacing the fixture.
=== CONCLUSION ===
Painting a kitchen sink is one of the most rewarding and cost-effective ways to refresh your entire kitchen. It requires minimal investment, basic tools, and a weekend of your time. The results can be truly transformative, giving your sink a polished, updated look that turns heads.
Remember that success comes down to preparation. Clean thoroughly, sand lightly, prime properly, and paint in thin coats. Let everything cure fully, and seal your finish for long-lasting protection. Avoid the common mistakes we covered, and your painted sink will look fantastic for years to come.
Whether you are refreshing a rental kitchen or upgrading your own home, a painted sink is a simple project with big impact. Grab your supplies, follow the steps in this guide, and enjoy your brand-new kitchen sink. You will be amazed at what a little paint can do.